Wednesday, 25 September 2019

Guest Designer Post September 2019 - Seahorses


Hello everyone..

My final contribution for September goes under the sea.
What a great stamp set this is, I just wish I had more hours in the day to 'play' with it more.

I have used  the Mermaid Queen set, to create this under water scene.


Products used: Mermaid Queen stamp set, acrylic paints, thin acetate, permanent inkpad that will dry on acetate and shrink plastic, gold pen and thread.
 
I started with the background so that it would dry, while I did the rest.
 
Cut an A4 piece of acetate in  half, and squeeze several different
 colours of acrylic paint onto one half.
Place  the other half of the acetate on top and run your hand over it to spread the paint.
Pull the two sheets apart and an interesting pattern may occur.


. At this stage you could sprinkle a little glitter over while the paint is wet. I tend to make a larger acetate piece so that I can cut out the most interesting section.
  Put aside to dry thoroughly.
 
The seahorse was stamped and embossed, then coloured with a gold glittery pen and the tiny one is done with shrink plastic. Very cute it is too.
 
The shells are full size .
 
Once the background was dry, I stamped the seaweed onto the front with a permanent inkpad. (I used Staz-on) and the card was assembled.
 
Well that's it for this session. I look forward to showing more ideas in my next slot.
 
Thank you for your comments, they are always appreciated. 
Best wishes
Carole


Wednesday, 18 September 2019

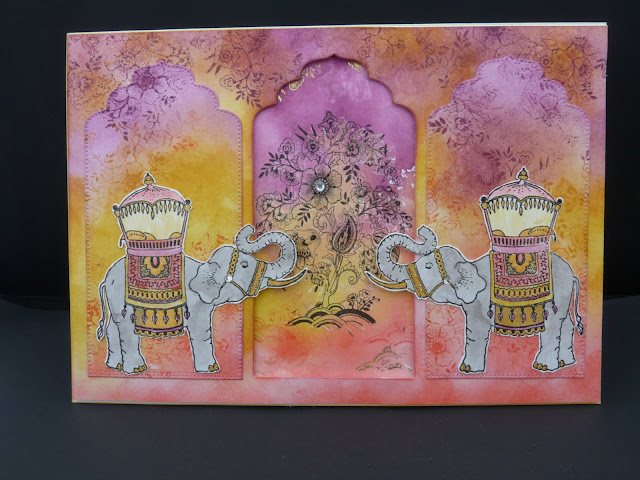
Guest Designer post - September 2019 - Indian Elephants


Hello everyone.

I am delighted to be here again and have a very different sample today from my previous one.

 I have chosen to use the beautiful Indian Elephant set of stamps for my sample. This set always conjures up colour to me so I have used brightly coloured Distress inks for the background.


The card front has two layers The top one has a die cut label hole cut into the centre to form an aperture with  two labels either side.

The layer behind was coloured and then the tree stamped, so that it was positioned centrally and would fit into the aperture space.
The two elephants were stamped, coloured and cut out.
The top layer and labels were then coloured  and the labels stuck onto the base. The front section was over stamped with the top of the tree.

This stamp set is so pretty and it has a variety of lovely images on it.

Thank you for visiting and hope to see you next time.
Bye for now
Carole

Wednesday, 11 September 2019

Guest Designer September 2019 - Russian Floral Egg coaster


Hello everyone.
 I am delighted to be here again for my September guest designer slot.

We all have stamps sitting in our stash that we look at and think I must do something with that, as I haven't used it for ages. So I have done just that for my projects this time.


I have been meaning to make this first project for ages, so what better time than now.

I have used the Russian Floral Egg stamp, which I think is a really pretty design.
I made it to be a large coaster, the button is flush with the edge of the hearts.


Products used: Russian Floral Egg stamp, five 8cm. wooden hearts, one 12cm. circular shape to mount them onto, black Brilliance inkpad, clear embossing powder, Distress inks to colour  or water colour pencils, glossy accents.


  Stamp the design and immediately cover with clear embossing  powder. I find it easier to ink the stamp up and place the heart onto it, so you can see exactly where it is positioned. Heat emboss, being aware that the wood gets surprisingly hot. Colour the flower and leaves.


 Put glossy accents over the coloured areas and leave to dry thoroughly.
 
 
 When the glossy accents is dry, colour the background. It doesn't matter if you go over the glossed areas as any gaps in the glossy accents will pick up the colour, giving a slightly distressed look.
I then sanded around the edge lightly.

I coloured the centre of the circle before sticking the hearts in place with a good quality PVA glue.

The centre will make a star shape and I found a lovely , conveniently sized, button to put in the centre.I sprayed the whole thing with a matt varnish to help protect it.

I think this would be lovely with a more Christmassy design on it, as a candle holder. Must work on that.


A couple of other ideas I have done uses the design for  book marks.
 This is a lovely gift for a friend who likes reading real books.
My daughter has a variety of book marks so she is an ideal recipient for my efforts.


The  shape has been cut from the centre of the egg.
The background card was stamped with Floral Weave.


Hope you have enjoyed my projects this time.
 
Thankyou for visiting.
See you next time.
Carole

Sunday, 1 September 2019

Chocolate Baroque card - Country Views cottage


Good morning.

A quick card contribution for today. I like this cottage as it reminds me of my grandma and grandpa, who lived in a thatched cottage for several years.


Chocolate Baroque Stamps used:_ Country Views (cottage, tree background)
 
 
 Stamp the open tree all over the background and leave to dry while you stamp the cottage and cut the ovals around it.
 Lightly add colour to the cottage and stamp the message.
Stamp the tree border so that the ovals sit in the middle.
 
 
Thank you for visiting today.
Bye for now and happy crafting
Carole