Showing posts with label Chocolate Baroque 15 minute card. Show all posts

Sunday, 15 July 2018

Chocolate Baroque 15 minute card - Essence of Nature and Rose Tree


Chocolate Baroque 15 minute card - Essence of Nature and Rose Tree

Hello everyone.
Today I have a quick make using these beautiful stamps. Love these two stamp sets.


Stamps used: Essence of Nature, Rose Tree, words from Pretty Poppies.
 
The background was made by stamping the top of the Rose tree with Picked  Raspberry Distress ink. I then brushed over the whole piece with a damp brush, to bleed the colour slightly.
The butterfly tree was stamped with black Versafine and coloured with the  Picked Raspberry ink.
The words are stamped onto parchment paper with a Staz-on inkpad, or you can stamp with Versafine and heat emboss with clear powder.
When this had dried,  I  used spray mount to attach it to the card.
 
Thank you for visiting and happy crafting.
Carole
 

Saturday, 16 June 2018

Chocolate Baroque 15 minute cards - Eccentric Edwardian and Rose Duo


Hello everyone.

It's that time again for 15 minute cards using Chocolate Baroque stamps.

I have two cards for you this week as seen below.


This first card uses the Eccentric Edwardian stamps and words from Punky Expressions and Loving sentiments.
The background was stamped directly onto the craft card with Sepia Versafine and Best wishes with the black Versafine.
The other elements were stamped with black Versafine onto  white card,  then cut or torn around.
The hat was coloured with black water colour pencils.
It was then assembled as shown.


My second card uses Square bubbles, word from Loving Sentiments, Butterfly from Butterfly poppy collage and the Rose Duo.
Each element is heat embossed with gold powder. I have used an anti static bag over the card and parchment before embossing, as metallic powders do have a tendency to stick where you don't want them!
I have stamped and embossed the square bubbles directly onto the craft card.The rose and word onto white card and the butterfly onto Parchment paper. This gives it a delicate look.
I decided to tear around the rose rather than fussy cut it and cut the butterfly around.
It was then assembled as shown.
The butterfly was stuck on using a spray mount.
 
Thank you for visiting and I hope you enjoy the other DT. samples on the web site.
Bye for now
Carole:)


Sunday, 15 April 2018

Chocolate Baroque 15 minute cards - Tall Trees and Floral Harmony


Hello everyone.
Today I have two  cards to show you, using the Tall Trees stamp set and Floral Harmony. They will both take about 15 minutes to make.

Tall Trees


I had a background piece in my stash made with Worn Lipstick and Weathered Wood inks. I really like the bright pink with the grey. Very moody.

I stamped the tree and verse with black Versafine
The Distress ink background uses the same colours, with the leaf over-stamped in the red.


Floral Harmony

What a great stamp this is. It looks good whichever way around it is put and I like that, as it looks slightly different each time. This is a clean, crisp card that can be used for any occasion.


I have stamped the image onto a 21cm x 10.5cm. piece of card and embossed it. Then I cut  around the tips of the left hand leaf, so that the ribbon can be tucked under the edge, as it is wrapped around.

The image is coloured with Brushos, giving a lovely vibrant look. This takes very little time as the colour stays contained within the embossed areas.

Mount onto a coordinated card base.
Any message can be added to this card.

Hope you have enjoyed seeing my cards and happy crafting.
Carole

Thursday, 15 March 2018

Chocolate Baroque 15 minute cards - Edwardian Man on Bike and The Road Travelled


Edwardian Man on bike


Hello.
 Today I have two cards to show you which should take no longer than 15 minutes to make.
Always handy when you realize you have forgotten a birthday.


Stamps used: Chocolate Baroque  Eccentric Edwardian


Stamp the bicycle onto the card base and onto a piece of masking tissue.
Cut the mask out. It is an easy shape so doesn't take too long.
Mask the cyclist and over stamp the image with the large text stamp with sepia ink. Remove mask.
Stamp the message tag.
This was then trimmed to a 14cm. (5 1/2inches) square and mounted onto a 15cm.  (6 inch) card base.


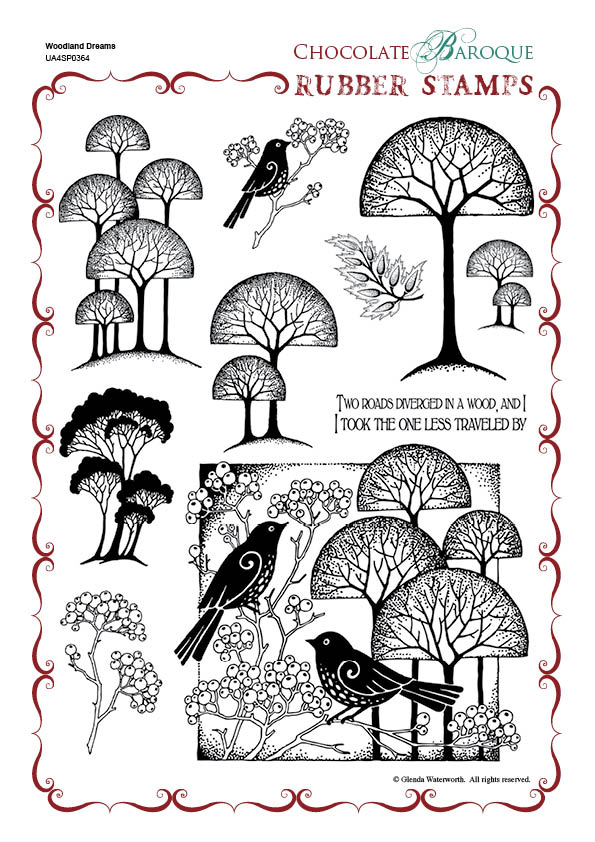
My second card uses a favourite set of mine : Woodland Dreams


    This was one of my very early purchases from Chocolate Baroque, which I still enjoy using regularly.

The background is made with Distress inks: peeled paint, bundled sage and dusty concord.
This has been over-stamped with one of the many tree designs that are in this set.
The bird branch and extra branch have been stamped with Versafine,  and a bit of colour added to the berries.

I have put Glossy Accents on the bird and berries, but I realized this would take longer than the 15 minutes, by the time you have stamped the message and mounted the card up. Just a way to emphasize these elements , if you wish to.

There are several other lovely samples on the design team blog at the moment which will take 15 minutes or less to make. Always useful if time is short.

Thanks for visiting and happy crafting.
Bye for now.
Carole
 

Tuesday, 13 February 2018


Hello  to anyone reading this.
Hope your day is good.

I am excited at the moment, as I have my second Guest Designer slot for Chocolate Baroque coming up, starting tomorrow, 14th February (three weekly sessions).

I have had great fun making the projects for this slot.
I have used  a colour way I wouldn't normally use, some of my favourite stamps and my Brushos.
These rarely see the light of day and each time I use them I wonder why this is so! It is so easy to get an interesting and colourful background with them.

Anyhow, just a quick sample showing a card  I made with the same colours as my first post tomorrow. 

This was made for the Hochanda show last week and many other DT. samples can be seen on the Chocolate Baroque blogposts, face book pages and Pinterest.


Quick and easy, it just involves stamping and heat embossing with these great border stamps.

Stamps used : Landscape edges.
Jeweled gold embossing powder - Stampendous

Thanks for visiting and I hope you will follow my next three GDT. member posts too.

Bye for now and happy crafting
Carole

Monday, 15 January 2018

Chocolate Baroque 15minute card


Today I have a card suitable for men, using some of the stamps on the Eccentric Edwardian   set and the Punky expressions words.


The script was stamped first with Distress ink and when dry, I cut out the circle.
This was stuck onto a craft card and a border drawn around the edge with a fine black pen.
The car was stamped with black Versafine ink and cut out. This was the most time consuming bit, but is a very simple shape that can be cut out quickly.
Coordinate the card strips to go onto the bottom of the card and add your message.

                                                                  Thanks for visiting.

 Carole


Thursday, 16 November 2017

Chocolate Baroque 15 minute card - Floribunda Net


Floribunda Net -  15 minute card

Hello everyone.
Today I have another 15 minute card to show you that is very simple to do, but very effective , I think.

I really like black and white cards and  you can always add a little touch of colour to them, if you wish.


Stamps used: Floribunda Net
Words on the  Loving Sentiments set
Versafine onyx black inkpad
White and black card

I stamped  the rose several times onto  white card and trimmed it up to fit a square card blank. Instead of matting it onto black I used a fine black pen and drew lines around the edge, to give the appearance of layering.

I stamped it out again and cut around the top section and tore around the bottom, netted section.
This has been mounted onto black, which has then been torn into shape.
Lastly I added the words.

The black and white gives a lovely crisp look to your card, but any monochrome would look good too.

Thank you for visiting today and I hope you enjoy the Chocolate Baroque show on Hochanda on the 20th November.

                                                                  Bye for now
                                                                       Carole

Monday, 16 October 2017

Chocolate Baroque 15 minute card - Baroque Corner


Baroque Corners 15 minute card - Baroque Corner

Hello everyone. Hope life is treating you well.

Today I have a quick make to show you using the beautiful Baroque Corner stamp


Stamp the large design from the  Baroque corners  and trim  down to a 12cm x 12cm. square. ( 4.75 inches)

Slice across the centre of the design  and mount onto a 14 x 14 cm. piece of  black card, leaving a  1cm. gap for the words. ( Amazing Mackintosh Words)

Mount onto  a 15cm. x 15 cm. card blank. ( 6 inches).
 
The card below is the same design in a different colourway. Still prefer the black and white version.


Thank you for visiting and I hope you will give this very simple project a go.

These corners are really beautiful for building up patterns, as you may have seen from one of my previous posts.

                                                                          Bye for now
                                                                              Carole

Monday, 18 September 2017

Chocolate Baroque 15 minute card - Harlequin Rose


Harlequin Rose 15 minute card for Chocolate Baroque


I have had this stamp set for a long while and I still think the  images are great.
 I made this as a wedding card for a friend.

Stamps used: Harlequin Rose set
Clear or white embossing powder
Distress ink : raspberry

I stamped the image with a clean VersaMark ink pad and clear embossed it. You can use white  embossing powder too, although I always feel it has a slightly softer look using the clear. Personal preference.
Stamp and emboss the large border in the same way.

Colour the background using cut-n-dry foam, making it darker on the rose head and around the edges.

The congratulations is a peel off that I found in my stash. Haven't used those in a while, I was quite surprised that it was still sticky!
 
Thank you for visiting and have a great day.
Happy crafting
Carole